Monday, January 20, 2020

kitchen update # 67 - contact paper backsplash

at target i picked up some peel-and-stick removable wallpaper with the pattern of subway tiles on it.

this stuff
https://www.target.com/p/devine-color-textured-subway-tile-peel-38-stick-wallpaper-black-white-threshold-8482/-/A-50513237

its like contact paper. i could pull it off and reposition it multiple times to get everything lined up perfectly. and whenever i get around to figuring out what i really want as a tile backsplash, it'll pull right off, easy peasy, just like contact paper does.

it comes in vertical rolls like most wallpaper does, rather than horizontal, which would have been easier for the backsplash. its 20 inches wide (51 cm), so i had to cut lots of short sections for that backsplash area and spend a bit of extra time lining them up. but it actually wasnt too bad to work with, being able to be repositioned.

it took me a while to get it all in, but i'm happy with it. it's easier to wipe clean than the walls underneath, which arent perfect because they didnt need to be, because they'll eventually get tiled over. it does show some of the imperfections of the wall underneath, but i dont much care because its temporary

.1-2020 (41)

.1-2020 (50)

.1-2020 (55)

.1-2020 (89)

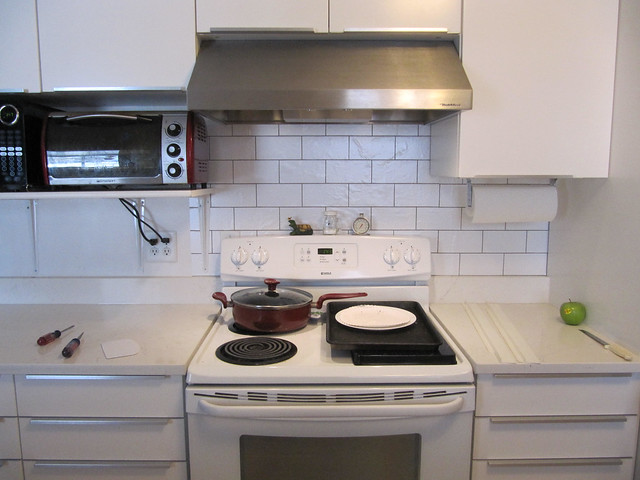
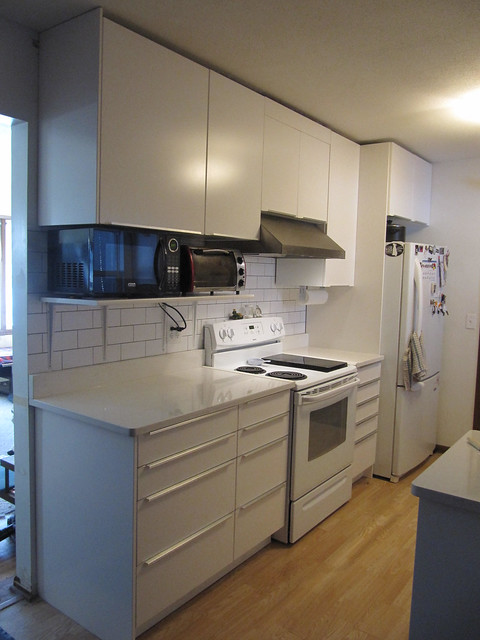
stove/fridge side finished
.1-2020 (53)

sink side finished
.1-2020 (90)

now that its all in place, it did make me realize that plain white subway tiles (which would be the cheapest way to go) look REALLY plain and boring next to the white cabinets and mostly white counters. i definitely need more color or pattern there. which is kind of what i expected, and why i havent settled on backsplash tile yet.

.1-2020 (54)
.1-2020 (91)

at least now i have plenty of time to figure that out. no rush. no pressure. i can take my own sweet time and check out tile places other than the big home improvement stores. see if i can find something i like, that wont break the budget. its a big kitchen and will require a LOT of backsplash tile, which gets cost prohibitive fast.

Monday, January 13, 2020

kitchen remodel update # 66 - adding an outlet

dad came up today and we were going to change out a single set of outlets and put in a wider electrical box that would fit two sets of outlets.

that outlet is a special outlet with USB charging ports in it.
.1-2020 (78)

i want to install my under-cabinet radio, but the bulky plug for that would partly cover the USB ports, rendering them useless. i use those usb ports all the time! thats where i charge my phone, my kindle, my mp3 player, and my camera battery. but if i add a second set of outlets right next to it, then i could plug in my radio in on one side, and still have access to my USB charging ports on the other.

since the existing outlet is only a single wide, we'd have to pull everything out and then remove the outlet box from the wall. this would mean making a hole in the sheetrock so we could pry the old box away from the stud it'd be nailed to, and then installing a double wide box. and then doing sheetrock repair.

happily, it turned out we didnt have to replace the box!! the one that was in there already WAS a double wide box. it just had a single wide metal plate on the box for the outlet and cover to screw into. so we went to the store for a double wide metal plate.

existing single wide plate cover on the right, new double wide plate cover on the left
.1-2020 (84)

dad carefully cut away the sheetrock around the single wide opening to make it as wide as the double electrical box so we could get the old metal plate off and put the new one on. but he cut away only just exactly enough sheetrock, so we didnt even have sheetrock repair to do!
.1-2020 (80)

heidi helped (i had to warn dad heidi had flopped down right behind him)
.1-2020 (81)

then dad wired in the second outlet. it was a very busy box because all the kitchen outlets were wired to TWO circuit breakers. black wire, white wire, and RED wire. three sets of wires coming into the box and being wire-nutted together to connect up and then go back out for the next outlet down the line.
.1-2020 (82)

the messy box, adding a ground wire in
.1-2020 (86)

we had trouble getting all those wires pushed back into the box in a way that would allow both sets of outlets to be pushed all the way in. on our first attempt, one of the wire nuts came off, so we had to pull it all out and twist those wires back together again putting the wire nut back on. then we did some more rearranging and pushing and got them all in. that special USB charging outlet is a larger outlet than the regular one and was harder to fit in.
.1-2020 (87)

eventually we got them all in place and got the cover put on. yay!
.1-2020 (88)

flipped the breakers back on and all the outlets work. double yay!

dad and i were greatly relieved to not have to replace the box and not have to do sheetrock repair.