Monday, June 24, 2019

kitchen update # 53 - starting on the toe kicks

today i cut the toe kick pieces for the fridge/stove side of the kitchen.
476

heres the 18" cabinet between the fridge and stove. the black clips slide or twist into a grooved area on the back of the toe kick.
604

the clips snap around the cabinet legs
606

we hung the cabinets just a little bit higher than the suggestion because the suggested height meant the adjustable legs would be as short as they could go and couldnt adjust any shorter. my floor is uneven. all my cabinets are level, but the toe kicks are just a little bit short.
607

but you cant tell unless you're down on your belly on the floor
608

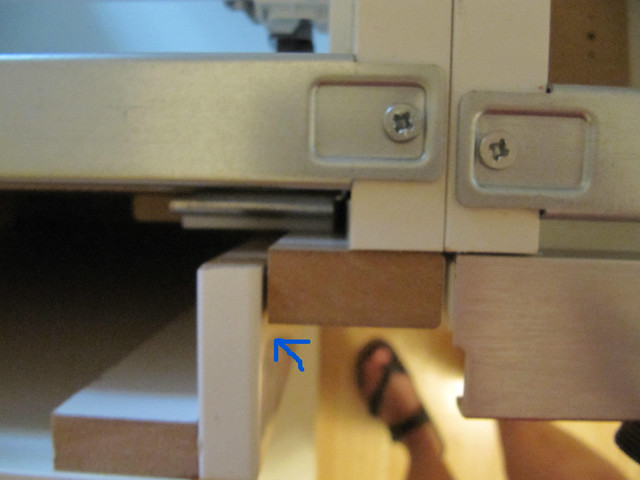
the cut end of the toe kicks went against the end panels, and the end towards the stove got an end cap type piece that snaps on. i had to cut the toe kick twice because i cut the toe kick to size, but didnt account for the added end cap piece. here you can see it lines up perfect with the end of the cabinet, so it cant be caught if the stove is pulled out.
609

the cabinets on the other side of the stove were 42".
610

sliding the clips in place
611

the clips had to be lined up right with the legs so it could be snapped in place.
612

looks so nice! and no more tennis balls under my cabinets, hehehe.
613

again with the end cap piece on the stove side
614

and again with the gap you cant see unless you're down at eye level
615


i *tried* to work on the toe kicks on the other side of the kitchen, but complications prevented that.
574

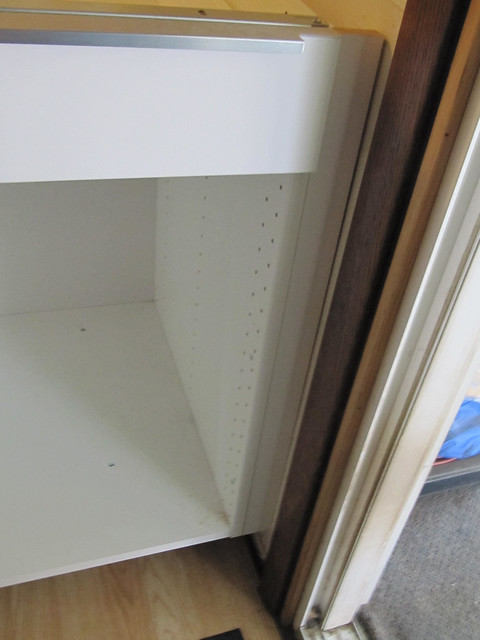
on the peninsula, the 24" cabinet that faces the dining room was the first problem. the back side of the 30" cabinet has end panel pieces going all the way down to the floor along the outside back edge. the toe kick for the 24" cabinet is recessed back under to connect against the cabinet legs with the clips.
618

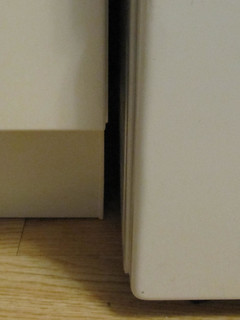
but that leaves a gap between the toe kick and the back panel on the left end. i got the piece cut to length though.
617


and on the other side, the inner corner/kitchen side of the peninsula, things went wonky as well.
619

(a peek at the way the peninsula cabinets are attached to the floor)
620

i thought the cabinet legs would be equal distance from front and back. nope. they do not line up. the back legs are closer to the back of the cabinet than the front legs are to the front of the cabinet. back leg of the cabinet that faces the dining room on the left, front leg of the cabinet facing the kitchen on the right.
621

they're not even. so the toe kick wont attach right.
622

and the laminate floor is also SHORT there. and we have no more left and the laminate flooring is discontinued and not even available online anywhere. it was 11 years old.
623

and until i get that piece in place, i cant cut the piece that goes along the sink cabinet. will have to talk to dad about these challenges.


i also set pieces of the trim above the upper cabinets (they're just sitting loose up there, not installed), choosing the curved edge facing out (top)
.6-2019  (157)

over the flat edge facing out.
.6-2019  (160)

curved edge
.6-2019  (158)

flat edge
.6-2019  (159)

its a subtle difference. but the more i look at it, the more i dont really like either edge.
they're boring.
598
maybe i'd like the more decorative trim piece better. but that will require another trip to ikea.

and theres a problem with this trim. the underside isnt finished. when you open the door you can see the unfinished brown. i'd have to paint it white. i dont like this.
603

Saturday, June 22, 2019

kitchen update # 52 new kitchen sink

mom and dad think i should get quartz countertops despite costing twice as much. and if i do that then i can get an under-mount sink so there will be no sink lip/edge for things to get caught on. the current sink we bought is top-mount, what you need if you're getting laminate counters.

i did a bunch of googling about sinks made of the different materials. obviously i'm not interested in the porcelain/enamel types since thats what my old, ugly, chipped, stained, despised sink is. stainless steel is what i initially chose to replace it.

but now theres acrylic sinks, pressed granite, or pressed quartz sinks. and after all that information overload, i've decided screw it, i'm just sticking with stainless steel. and returned the top-mount sink and ordered an under-mount sink. the only undermount sinks the store had in stock were twice what i wanted to spend, without anything i could see making them better. oh they include the sink strainers, great. thats less than $30, not another 200. they werent the thicker gauge steel. they werent larger or deeper. i chose the $155 one i had to order, not the in-stock one that was $369. i couldnt figure out what made it cost $200 more. the under-mount sink was about $60 more than the top-mount sink.

still havent really sorted out which counters i want. need to make another trip to ikea to ask questions about mounting quartz countertops on the cabinets.

i glued up the special pieces to the inner peninsula corner filler pieces so they could be screwed to the cabinets, and let the glue dry a couple days.
582

583

one of the L shaped inner corner pieces broke off its glue after i had installed it while i was trying to install the other piece. not very reassuring on the glue! i got the other piece in. unscrewed the piece that came unglued, and re-glued it using another kind of glue. i let that dry and got the filler piece between the peninsula and the porch door installed.

this is the first filler piece attaching to the side of the cabinet next to the sink
566

this is the second filler piece attaching to the back of the peninsula cabinet facing the dining room. i had to use the backer board piece as part of the filler piece in order to be able to attach it to the cabinet.
565

those two filler pieces - they are NOT attached to each other. they are screwed individually to the separate cabinets.


the cabinets before the filler pieces
554

peninsula inner corner filler pieces are in!
568

569

the inner peninsula corner filler pieces gap at the top. all those filler pieces need caulking. but i want to do the caulking all in one go since its from a big caulk tube. i dont want it to dry out between uses. so i have to wait until everything is finished.
567


i picked up some cabinet catch/latch things from menards that dad thinks will hold the dishwasher panel in place and let it be removable if needed.
598
597

Sunday, June 9, 2019

kitchen update # 51 - upper cabinet cover panels

earlier this week dad asked what i was doing and i volunteered to haul all those pieces down and we cut them on his table saw, and discussed a possible way to attach the dishwasher filler piece. lots of cutting and even more measuring.

dads table saw. the green lines are green painters tape, so the pricey panels dont get scratched or marked on his old table saw.
564

dad re-cut peninsula back panel piece to replace the old one that was too narrow.


dad came up today and helped me with the cover panels for the upper cabinets. the one by the living room (stove/fridge side) went up fine. the wall was not straight so we didnt have to cut a notch for the suspension rail that sticks out on top. we took down the cabinet door, clamped the panel on, and drilled and screwed it in place from inside the cabinet.
576

the other side by the porch door (sink side), we had to cut a notch at the top for that one. we used my oscillating tool and it took us about 4 tries to get the notch right. i didnt take any pictures of cutting that notch, darn it. it was a pretty good notch on the back side only, not showing on the front side. we also had cut back the suspension rail a bit closer to the cabinet.
578
579

then took off that cabinet door and dad held the panel up while i clamped it and screwed it in place from inside the cabinet. so they're up and look lovely.
577


the over-the-stove filler piece, both its ends are cut/unfinished. so if its pushed out even with the door fronts, its cut ends will show. if its pulled back even with the cabinets to hide those, it will be sunken back from the doors. we talked more about it, and the dishwasher filler piece and how to mount them. in my infinite clumsiness, i had dropped the over-the-stove piece and scratched one side and chipped the other. dad thinks a tiny amount of paint on the small chip will make that side work. and i can use the iron on edging stuff for the two exposed ends. then it can sit pushed out flush with the cabinet fronts, rather than set back flush with the cabinet and recessed from the fronts. but if its flush with the fronts, the cut ends show so it needs the iron on edging stuff. or, i could buy a 30" wide 5" tall drawer front and dad could cut it from 5" down to the 3-4 inches we need. the drawer front is $21. i'm gonna try the edging stuff and see how it looks. i'm not sure the edging will match or not since its not from ikea.


i need to make a list of questions for the countertop people. and do some research about undermount sinks and potentially not stainless steel sinks, the nicer sinks to go with quartz countertops. mom and dad think i should look more into the quartz countertops even though they're more expensive. i'm not sure about which quartz i would want. so more research must be done. and the sink i have which is a topmount meant for use with formica countertops will have to be returned/exchanged.

heidi wanted to supervise and shove her nose in to investigate while we were out in the porch cutting the notch in the cover panel. she just kept pressing in close to me so i gave up and hugged her and petted her for a few moments, then she was willing to back up and let me cut safely. she was extra needy for attention while my dad was here.

i need to hit the home improvement store and look at ideas for attaching the dishwasher panel.

Saturday, June 1, 2019

kitchen update # 50 base cabinet cover panels

PART 1

we measured twice and cut once but some of the measurements ended up wrong because the floor is a floating floor and is uneven. so the measurement was correct where i took it, but was not the same measurement across the entire floor along the backside of the peninsula cabinets. the two panels for the backside of the peninsula where that floor was uneven - they both needed only 1/16-1/8 inch taken off the height - even though the end panel around the corner from those two back panels was exactly the right (same) height. when we installed the laminate floor 8 years ago it was because the subfloor was uneven and the laminate 'floated' and disguised those inconsistencies. anyway, the peninsula end panel that was the right height, i think i should have written 5/16 but i wrote 5/8 so it was 5/16 (half of 5/8) too wide. oops.

one panel was right on! the base panel on the stove/fridge side by the living room door. so we were 1 out of 4. *sigh*. that was frustrating.

we got that one cover panel installed and it looks great. we had to carefully make a little notch at the inside top corner to cover up where the suspension rail extended just a tiny bit past the end of the cabinets to find the stud.

the extending suspension rail
562

the notch we made in the upper inner corner of the panel
560

the end panel in place
563

then we put a strip of painters tape (easily removed) on all the remaining panels and marked them with arrows as to which edge to cut and what size to cut to. packed them back in their cardboard, and sent them back home with dad. so its right there already worked out. cut that edge only, to x size. the end. next panel.

we also measured up some sizes for the filler panels between the peninsula cabinet and the wall by the porch door, and the L shape of the inner corner by the peninsula that will take two pieces to match up just right.

PART 2

that was like last week some time. dad did the re-cutting and cut the first three filler pieces and brought them back up so we could try again.

the filler piece between the peninsula cabinet and the porch door was just a smidge too wide, needed 1/16th taken off to fit. so i marked that and sent it back home with him. the two L pieces for the peninsula inner corner fit perfect! yay! but they'll need to be glued to a couple other pieces to allow me to screw them in place.

the gap between the peninsula cabinets and the wall by the porch door
557

we got the peninsula end panel on great! got the first backside peninsula cover panel on, but had to shim one corner of it up from the floor ever so slightly to make that outer corner align perfect from top to bottom.
573

the last back panel piece for the peninsula next to the drawers ended up a little too narrow for my tastes. by at least 1/8". this happened because the back edge of the peninsula end panel was cut so that the front edge would remain finished. that back edge needed to be overlapped with an uncut edge from the backside panel. well that back panel ended up having to be scooted out just a tad more than what we measured to fully cover that cut edge. which left a gap between the other back side panel. so damn fiddly, grrr. if we'd waited to cut that last back panel until we had the first two installed we'd have been ok. but since the table saw is at my dads house and my kitchen is at my house... we marked and cut everything at once.
.5-2019 (160)

i didnt like that gap, but didnt to buy another panel. (these cover panels are NOT cheap!) the gap exposes the unpainted back side of the cabinet. dad said i could paint it. i said i wanted to think on it. it seemed too large a gap, something i'd see every time i passed it and regret 'making it work'. but sometimes i overreact, so i needed time. i clamped it in place and walked by it for a few days and decided i was right, too big a gap, i couldnt do it.

PART 3

thursday mom brought up the re-cut filler piece for by the porch door and it fit perfectly. well, not perfect as the wall wasnt straight, but caulk will fill in the gap near the top.
570

i glued another piece to the filler piece and screwed thru the cabinet into that L shaped piece to hold the filler piece in place.
571

thursday afternoon i decided to do something with that busted cabinet door - the one they mailed in a box that could have fit 12 of them, where the bottom edge was all dented up. (they sent me a new one, packed in a more appropriately sized box with less room to shift and bang about in a UPS truck. they didnt make me return the damaged one.) so the damaged door has just been sitting around.

it was long enough and wide enough the busted end could be cut off, and the edge of the door with the pre-drilled hinge holes could be cut off as well. so i put a piece of painters tape and marked the edges to cut and the sizes to cut with.

i took the too-narrow panel piece and marked it with the size to cut for the filler panel between the dishwasher and the wall. it was already the right height. and that is a wider filler piece, just over 5" wide. we still have to figure out how to attach that one. seems like something we maybe should have figured out before installing the dishwasher...

i also measured the two UPPER cabinet end/cover panel pieces and taped and marked those up. so thats 4 panels. then i measured the filler piece up above the cabinet over the stove, since we dropped that cabinet down from the ceiling a little so it would have the exhaust vent hood at the right height above the stove. we cut the piece going across back then. but to install it... how? so i measured from that cut piece panel back to the wall and we'll turn it into a u-shaped thing and screw THAT to the side cabinets. voila. ...this probably needs pictures to explain. they'll come.

then i measured the last remaining strip of laminate flooring i have (they discontinued it, no more is available) to have dad cut that into thirds, and hopefully we can put that in place along the sink side cabinets between the edge of the existing floor and where the toe-kick will go and fill that gap