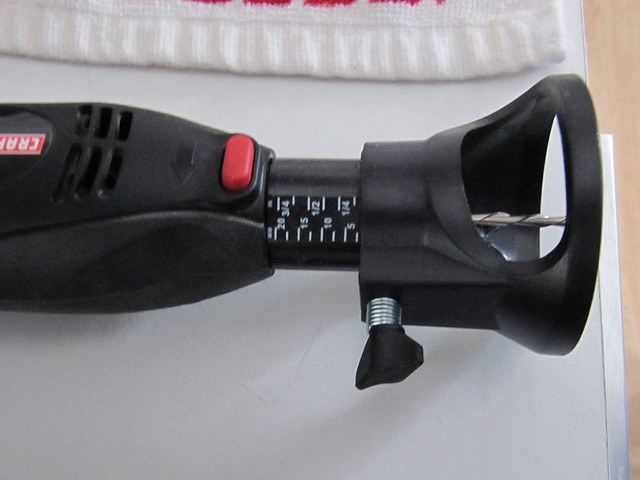
here's the dremel cutting thingy. the black plastic part lets you hold it flat against the surface you're cutting so you get a vertical cut.

the drill bit looking thing is the cutting part, you slide it sideways and make whatever shape cut you want.

and you can adjust the black plastic part to control the depth of cutting
i sorted all the ikea stuff and made a pile of things to return.

including the 18x40" upper cabinet i got to replace the 15" one when we thought the over the sink cabinet wouldnt work out. before the window got replaced and now it will work out. i measured to see if the 18" one would still work but my math skills are impaired. when i measured again i realized only 15" would work. so i had to go back to ikea after dad and i just went to return it and buy the 15" one.
so yesterday i went back to ikea and returned more stuff.
the 18" cabinet, door, and shelves.
the trim piece for above the fridge under the fridge cabinet that i opted not to use.
4 drawer fronts. two were outer drawer fronts that were the extra-tall/hiding the inner-drawer fronts, that i changed to smaller outer drawer fronts for all the drawers rather than the hidden shit. two were the inner/hidden drawer fronts i changed out to be outer drawer fronts.
4 sets of hinges.
1 set of door dampers.
and three sets of the 2" wide blanket handles that i opted not to use, choosing to go with the wider handles instead.
then i ordered the 15" wide cabinet, door, shelf, and a third support for the kitchen island like the instructions show to use. i meant to order two sets of shelves, but mistakenly only put one on my list so the guy only ordered one. i didn't realize it until i picked them up from the order pickup place and it was too late then. the door was SUPPOSED to be back in stock today, which was why i waited til today to go. but this morning their website changed it to tomorrow. *sigh*. i wasn't willing to go today after the library. and no way in HELL was i going to ikea on a weekend.
the returns came on 3 different darn gift cards. supposedly because they were on three different receipts. but i've returned other stuff from different receipts and they put it all on just one card. *rolls eyes*. seems nobody gets quite the same training in their returns department. i used one and a half cards to pay for the order upstairs in the kitchen department. then i went shopping. i picked up these tall u-shaped metal divider things for things like cookies sheets.
but best of all i found a new curtain rod for the sliding glass door to the porch! one long length with only two hanging mounts on either end instead of the stupid mount in the middle that my current rod has. the stupid middle mount stops the curtain from being able to be pulled ALL the way back or even halfway back. i'm excited about a curtain rod.

the old curtain rod with its three mounting brackets (that were flimsy and got bent out of shape)

ta da!

a cute photo of puppy *helping* me make the curtain back in 2006.

(my dungeon basement with its old dark paneling that is all gone now, you can see the theme in this house with the dark woodwork, dark basement, dark kitchen).
cuz tennis balls always help with sewing

then i assembled the 15" cabinet. i struggled a bit but got it hung up on the suspension rail by myself. so everything is ready and waiting dads next visit. we'll get that over the sink cabinet up with all its cutting and wiring.
i did some more reading about how to assemble and attach the peninsula part of the base cabinets. found some suggestions about possibly screwing the sides of cabinets together before they're fully assembled since one faces forward and one faces backward and the back of the cabinets will interfere with clamping to screw together once they're installed. but i figured out how the supports for the peninsula work, how they adjust up and down to level the cabinets so the countertop will all be level even without them being on the suspension rail like the other two cabinets will be.
No comments:
Post a Comment